 Open Firenet
MQTT
The bridge can publish the stove state to your MQTT broker and accept commands from it. It is the way in for home automation systems other than Home Assistant: Jeedom, openHAB, Node-RED, Domoticz and any MQTT client.
MQTT is optional and off by default. It needs bridge firmware 3.3 or newer, and a broker on your network (Mosquitto, for example). For Home Assistant, the integration remains the most complete way; MQTT discovery is the alternative that needs nothing installed.
Set it up
- Open the bridge's page and go to the Bridge tab (
http://open-firenet.local/#bridge). - In the MQTT card, enter the broker address and port (1883 by default), and the user and password if your broker asks for them.
- Tick Enable MQTT and save. The badge turns to "Connected" within a few seconds.
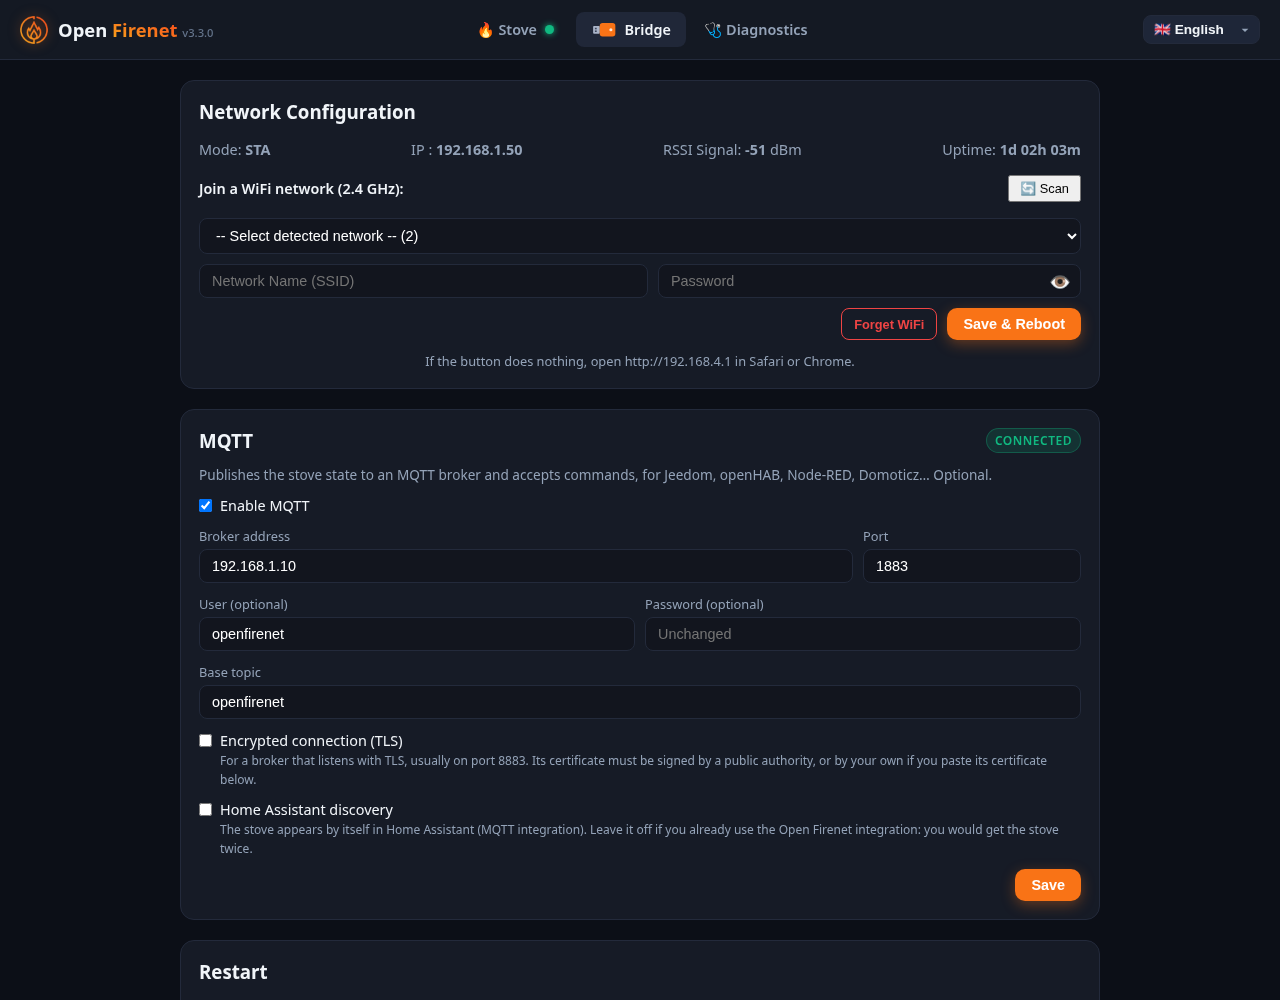
What the bridge publishes
All topics start with a base topic, openfirenet by default. Change it in the settings if you have several bridges.
| Topic | Content |
|---|---|
openfirenet/availability | online or offline. The broker sets it to offline by itself when the bridge disappears. |
openfirenet/state | One JSON message with the device, stove, sensors and controls objects, same names and units as the REST API. Sent when something changes, at most every 5 seconds and at least every minute. |
openfirenet/<section>/<name> | The same values, one per topic, for systems that prefer plain values: openfirenet/sensors/room_temperature, openfirenet/stove/state, openfirenet/controls/on... |
Everything is published with the retain flag, so a client gets the current values as soon as it subscribes. openfirenet/device/connected tells whether the bridge is linked to the stove; until it is, only the device values are published.
Send commands
| Topic | Payload |
|---|---|
openfirenet/set/on | true / false, or ON / OFF |
openfirenet/set/mode | manual, auto or comfort |
openfirenet/set/power_percent | 30 to 100 |
openfirenet/set/target_temperature | 14 to 28, in whole degrees |
openfirenet/set | Several settings at once, as JSON: {"mode": "comfort", "target_temperature": 21} |
The other settings of the REST API (frost protection, MultiAir fans, schedule...) are accepted the same way, under the same names.
# 21 °C, with the Mosquitto command line client
mosquitto_pub -h 192.168.1.10 -u myuser -P mypassword \
  -t openfirenet/set/target_temperature -m 21

# watch everything the bridge publishes
mosquitto_sub -h 192.168.1.10 -u myuser -P mypassword -t 'openfirenet/#' -v
Do not publish commands with the retain flag. The broker would replay them at every reconnection, and could switch the stove on by itself; the bridge ignores them for that reason. Commands are also ignored while the stove is not linked.
Home Assistant discovery
Since firmware 3.4, the bridge can also announce the stove to Home Assistant's own MQTT integration: tick Home Assistant discovery in the MQTT card and save. The stove then appears by itself in Home Assistant, as one device with:
- a thermostat: on / off, target temperature, and the manual / auto / comfort modes as presets;
- the heating power, the setback and frost protection temperatures, the room sensor calibration;
- switches for the heating schedule, frost protection and eco mode;
- the sensors: temperatures, pellets burned, service countdown, state, error and warning codes.
Home Assistant needs its MQTT integration connected to the same broker. Unticking the option removes the entities.
Use one or the other. If you already use the Open Firenet integration, leave discovery off: you would get the stove twice. The integration remains the most complete way: it also has the MultiAir fans, the slots of the weekly schedule and the external temperature sensor.
Encrypted connection (TLS)
Since firmware 3.5, the bridge can reach a broker that listens with TLS, usually on port 8883: tick Encrypted connection (TLS) in the MQTT card. The bridge then checks the broker's certificate, in one of two ways:
- Nothing else to enter when the certificate is signed by a public authority, for the name you entered as broker address: a hosted broker, or a home broker with a Let's Encrypt certificate.
- Paste the certificate of your own authority in the field that appears, for a home broker with a self-made certificate. It is the text starting with
-----BEGIN CERTIFICATE-----. The name in the broker's certificate is then not checked, as such a broker is usually reached by its IP address.
Only when you need it. Encryption is demanding for this small chip: it takes about 50 kB of its memory while connected. On a broker of your own network, plain MQTT remains the simplest choice. Use TLS when the broker requires it, or is outside your network.
Good to know
- Without TLS the connection is not encrypted: fine for a broker on your local network, not beyond it.
- If the broker is unreachable, the bridge retries on its own, every 10 seconds (every 30 seconds with TLS). The link with the stove is not affected.
Something does not work? See Troubleshooting.